Friday, June 13, 2008

Book Review - Elsie's Recipe Book

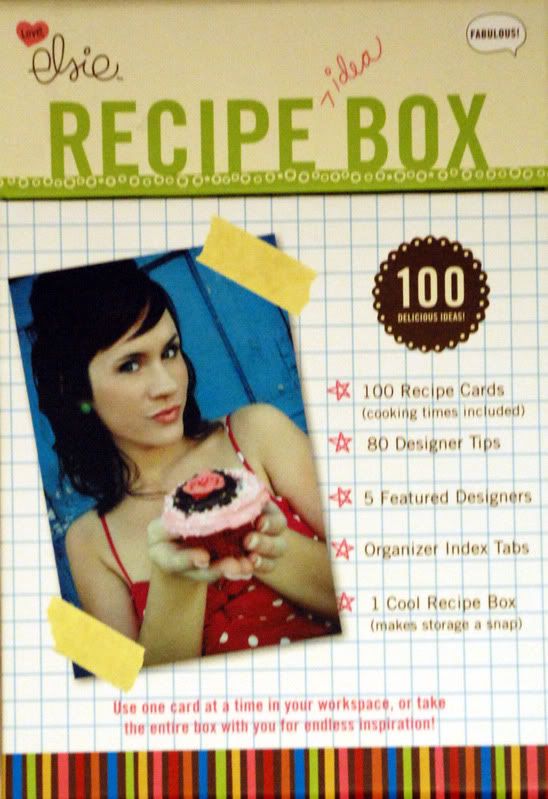
Elsie’s Recipe Box


I cannot tell you how excited I was to get this book. I bought it as soon as it started shipping! I adored the Elsie’s 52 Challenges book – adored it!!
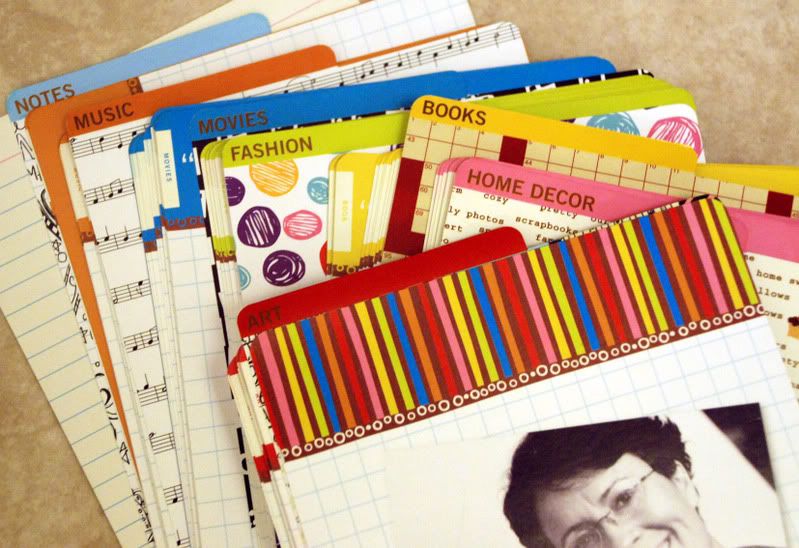
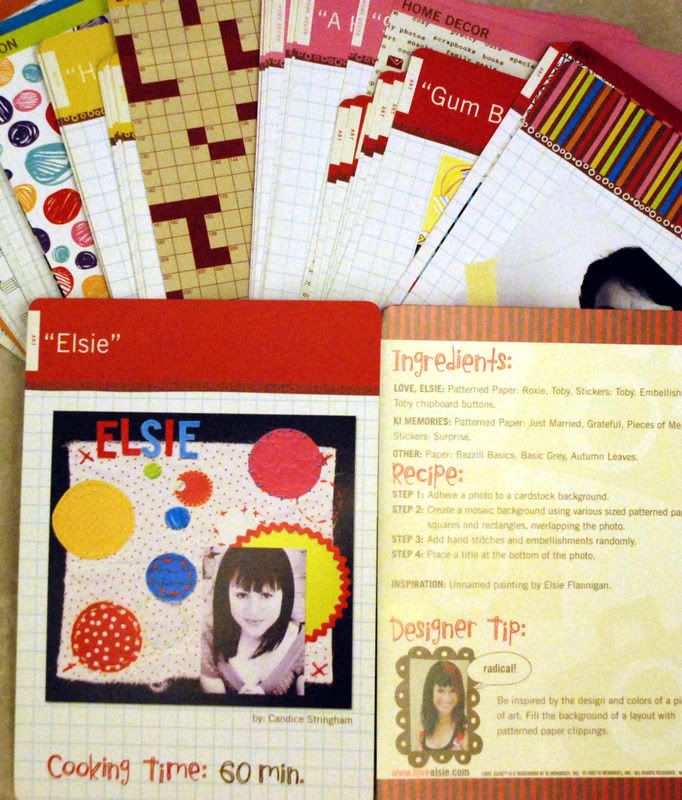
So I ordered it and waited with anticipation for it to come. When I received it, I ripped the box open and dug in. I have to tell you ladies – I was sorely disappointed. The concept is incredibly cool. A box of recipe cards – laminated and sturdy with the layout on one side – the “cooking time” give you an idea of how long the layout will take.


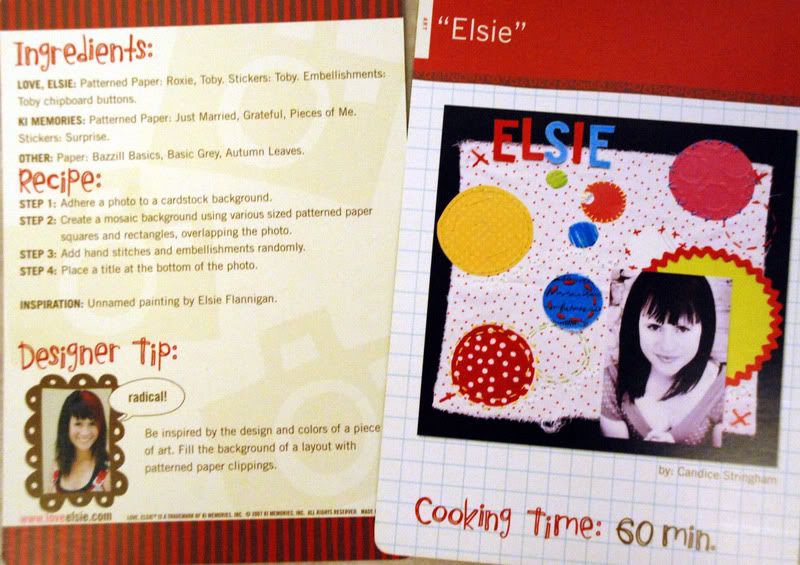
You flip that bad boy over and there you see – the Ingredients (a list of items used on the layout), the Recipe (step by step directions), and a Designer Tip from the artist that created the layout. Surely a winning combination – clever idea – how could you not just LOVE LOVE LOVE it???

I wanted to love it – I really did. I even put it down for weeks and tried to pick it up again right before I wrote the review to see if it was my mind set the day I received it (could have been PMS!) Nope – still was quite disappointed. I have not even flipped through all of the cards.


My disappointment stems from the layouts themselves. I am a self certified Elsie-a-holic. I have every piece of every line she put out (including the Hobby Lobby exclusives) until the Winter CHA. I am afraid I reached my limit of the same design in different colors and slightly different themed doodles. The layouts – each and every one of them use Elsie paper or KI memories paper. The styles are all identical.


A big contributing artist is Amber Skolnick (another one I adore). All of the work had the juvenile style. I like a bit of that – but since almost every card I looked at was that style – I quickly tired of it.

Again – I am a self proclaimed LIFTER as well – nothing inspired me to even noodge it, let alone flat out lift it. Again – the idea is ALL KINDS of GOOD! The execution is where I was extremely disappointed.

Overall Rating: 3 stars
I give the book 3 stars based purely on the concept of the book - it is phenomenal! I think improvement could be made in execution. While I love the concept and I love Elsie's designs, because the patterns and her style are both so specific, I would like to see them offer a product that mixed things up a bit in one of the two areas. Either show a different style using the papers, or incoporate other lines that we don't expect to see done Elsie-style.

If you have the book – I welcome your opinions. While I will always tell you what I truly think, I'm also eager to hear your true thoughts.


Lisa

Thursday, June 12, 2008

Summer StashBuster Pre-Challenge!

As promised, here is the first StashBuster Challenge - which is actually a pre-challenge, as the "program" will start on Sunday.
This time around we are posting a challenge for you every 3 days. You will get 5 points for completing the challenge, and each challenge has an additional 5 bonus points available.

For the Pre-Challenge, you have a product list to of commonly stashed items to use, and you must use at least 4 of the 5 items on the list:

1. Any Basic Grey paper line
2. A crocheted or hand-sewn item
3. Prima flower(s)
4. A Thickers alphabet
5. Photo corner(s)

The bonus for this challenge is to follow the sketch below. This was the left side of Kathleen's QT2 layout from Spring Survival:


My interpretation of the sketch is this:


And here is what I used:
Patterned Papers: Basic Grey Skate Shoppe
Flowers: Prima/Imaginisce (crocheted)
Photo Corner: Basic Grey chipboard
Alphabet: Thickers
Brads: O'Scrap

Using the sketch, this layout literally came together in under an hour, and I really like the results. I can't wait to see what you do with the first challenge! And yes, points will count for this challenge too!


Spring Survival is almost over...and StashBuster is almost here!

Hello all!
Tomorrow is the official end of the Spring Survival Program :( And while the forum and gallery will remain open, the deadline for the Use all 40 Challenge is July 13! How are you progressing??? I've seen that several of you have used up the majority of the kit! Mission Accomplished! I bet when that huge box arrived on your doorstep 7 weeks ago, you never thought you'd use it ALL! :)
I have one more bonus layout from Leena that I will post in the forum today, but I wanted to let you all know that we are ready to jump right into the StashBuster Challenge in preparation for the next huge box headed your way!
Sunday morning we will post the first challenge here on the blog. Then 3 days - yes, 72 short hours later - we will post the next one. Your job is to complete the challenge before the next one is posted. No, you don't HAVE to, but try to challenge yourself to get it done and move on - using as much of your stash as possible to create divine works of inspiring art ;)
If you're ready to get started busting that stash NOW, stay tuned! I will post a pre-challenge for you today!
Get ready! Loads of info coming at you today, here and in the forums. Be on the look out for a couple of new add-ons for Summer too. I thought they were all out, but it turns out that Prima order arrived yesterday with a few items I didn't think we going to make it in time, and therefore didn't post, and I MAY have ordered a bit more from Cosmo than I thought as well... OOPS! And then there's those yumm glitter Thickers! Good grief! It's never-ending!
Are you ready to BOLO? Keep those eyes peeled!

Wednesday, June 11, 2008

Member Spotlight! Leslie McCarthy

Welcome Leslie McCarthy!!


When did you start scrapbooking?
After the birth of my daughter in 2000, I remember walking down the scrapbooking aisles in a Michael's store and buying some pp and stickers. I loved the idea of being able to be creative, but even more to share the stories BEHIND the photographs to save for my children and future grandchildren. My first pages were VERY basic. I scrapped 8.5 x 11 for a while and then being a full-time working mom with two kids under the age of 2, I put it aside until about 2005. When I started scrapping anew, I changed to 12x12 - it allowed me more room for photos and journaling.

Who are your favorite manufacturers?
LOVING AC Thickers right now!! October Afternoon and Cosmo Cricket for patterned papers and I do love my Bazzill cardstock (although the new cardstock with the different colored core is pretty fun, too!)


What are your favorite embellishments?
My name is Leslie and I'm an alphabet sticker junkie!

How does your creative process work?
I started out being an event scrapper and have moved to being a moments and personality (along with events!) scrapper. I want to capture those moments of my kids' childhoods. My parents had 4 kids in 6 years and very little time to take photos. There are far fewer photos and they are not organized or even notations made as to family member names, dates or occasion. Same with my DH's family. I want to make sure that this doesn't happen with my family!!

How would you describe your style?
Independent. I don't scrap chronologically. I don't scrap every picture - in fact, are you ready for this? I also keep photo albums!!! I scrap for myself and for my family for the future (hope they’re interested!). I hope others viewing my pages get a sense of how special my family is and how very blessed I am.

Where do you find your inspiration?
Right here at home for subject matter. And for layout ideas, in classes like the Survival series. I'll admit I like scrap magazines and idea books but honestly rarely lift directly from them! (In fact, I think I'm about to start weaning myself from purchasing them!!)

Thank you Leslie for sharing your style with us!

Tuesday, June 10, 2008

Technique Tuesday! Computer Shaped Journaling

Janine Langer brings us.......
Technique: How to add shaped journaling with your computer

Step 1 First scan the patterned paper or shape on which you would like to add your journaling. The resolution should be at 300dpi. You can also try to recreate the shape in your graphic program, but I prefer scanning it in, because it is much faster. Here I scanned in two different shapes: first a tab shape, then a scalloped circle


Step 2 Choose a font and write your journaling/title, etc. on it. Important: Write them on a new layer if your graphic program doesn't do this by itself!


Step 3 Print them out, remembering to print the shape you scanned first too. Then adhere your original shapes directly onto the printed shape, using removable adhesive.


Step 4 Lay the paper with the shapes on it back in your printer and print it again. REMEMBER! You will need to delete the background so that only the text is printed this time!


You can use this technique on any layout or project. Just scan the parts you want to add your text onto, add the text with your graphic program and print it.
Other examples of this are my 'Sweetie' layout in week 3 or my 'Flying High' layout in week 4.


In each case, I created my page first using removable adhesive. Scan the entire layout in 300 dpi, then remove all of the pieces except the one you are printing on, and print directly onto the page. Finish your layout by re-attaching the other elements with permanent adhesive.


_____________________________________________________________

Monday, June 09, 2008

BONUS Spring Survival Layout and Instructions!!

Here is a super special treat! One more layout using the Spring Survival kit. Also included are the instructions. For those of you joining us with the Summer Survival kit - this is a glimpse of what you can expect in the the weekly lessons!


Remember by Leena Loh

"Supplies used"
Cardstock
Patterned papers: Cosmo Cricket Twist & Shout, Pink Paislee Spring Fling Collection (Umbrella Scallop & Green Lace)
Transparency: Prima Marketing Dress Up
Die-cuts: S.E.I Dill Blossom
Stickers: Cosmo Cricket Get Happy
Vinyl Appliques: Scrapworks Exposed Elements
Cardstock strip: Bazzill Strip
Brad: Heidi Swapp XL Jewel Brad
Tag: The Paper Pixie
Felt flower: Making Memories


"Directions"

1. Cut a piece of 5" x 9" Pink Paislee Spring Fling Umbrella Scallop paper and adhere onto left side of cardstock.

2. Cut 4.5" x 7" of Pink Paislee Spring Fling Green Lace paper and adhere onto the middle of the layout, overlapping the scallop paper.

3. Cut a circle swatch of Cosmo Cricket Get Happy paper and adhere to the bottom middle of the layout.

4. Adhere Prima transparency on top of the circle, tuck in half a strip of the Bazzill Edge below the photo and adhere onto the Green Lace paper.

5. Adhere a piece of The Paper Pixie scallop tag on the far right of the transparency, tucking in part of it under the transparency and photo.

6. Adhere a strip of the Cosmo's sticker just slightly under the transparency. Embellish with felt flower and the huge crystal brad on the right end of the sticker strip. Tuck in 2 pieces of the SEI Dill Blossom die-cuts under the felt.

7. Rub Scrapworks vinyl appliqué on the far right of the photo.

8. And finally, journal around the circle swatch

Sunday, June 08, 2008

Just Because

Hi Everyone!

Welcome to Summer! In July we will be launching something new at Homegrown. The collection is known as Just Because, and it is a kit designed for one simple reason - just because...

... Because I like the way the products work together. Because I love something so much that it just HAS to be done. Because life really should be simpler. Because I was inspired by a product or a color or a something... and wanted to share it with all of you.

The design team will create with the kit and you'll receive a pdf with your kit that contains the instructions, layouts, etc. just like the Survival Program.

These kits have no add-ons, no schedules, no subscriptions. They'll just pop up here and there when you least expect it, and surprise you with an extra bit of happiness to add to your scrappy life.

Now because I know you will want them all, I will give you a few days' notice before they are availble for purchase, so keep an eye on the blog! :) They will be sold first come, first serve, no re-orders, no pre-orders.

So with that introduction I present you with some sneaky peeks of the first Just Because kit - Chocolate Truffles. It will be available this month, and by the end of the week I'll give you the posting date so you can start stalking.

Enjoy the eye candy!


Saturday, June 07, 2008

Ad Challenge!!

Good mornig and Happy Saturday!

We start the weekend with an AWESOME AD challenge from Emelyn Magpoc!!

Here is the AD Emelyn used for her challenge:


Emelyn's fantastic interpretation of the AD:


I can't wait to give this a go this weekend!
How about you? I challenge you to do a layout based on this ad! Link your layout to this post and I will be highlighting the participants next weekend! One lucky participant will receive a RAK from me!

You have until Friday night to post your layout. Next Saturday morning I will select a random winner from those who post a link to a layout in the comments section of this post!!

Friday, June 06, 2008

Rebecca's Corner


Week Six of Spring Survival has come and it is hard to believe the program is in its last week.

The final lessons were posted yesterday with a bonus posted as well! The Sketches - all in one place - the ginormous SKETCH pdf. Holy Canoli ladies - ther are 80 unique sketches in that awesome pdf. It is sure to bring inspiration for a long time to come!!

With the last week of Spring Survival, we also see the final project from Rebecca. She leaves us with this sweet little tag.


Stunning detail and luscious layering!
Thank you for participating Rebecca!

Thursday, June 05, 2008

Summer Survival is available!

Have you orderd yours?


THE LIST
The Summer Survival Kit contains the following:

Patterned Papers
Contains 1 sheet each of the following:
Narratives Bloom: Poppy Flourish, Teal Label
Vita Bella: Blue Diamond Motif, Chartreuse Vintage Floral
October Afternoon Detours: Dirt Roads, Fruit Stand, Gazebo
October Afternoon Daydream Freshly Mown Lawn
Basic Grey Boxer: Vintage Tee, Henley
Basic Grey Cupcake: Cake & Ice Cream, Assembly Required
Scrapworks Magpie: Starburst, Sunshine, Pears
Heidi Swapp World Traveler: Dots, Map, Old Coat, Duffle
SEI Poppy: Sarong and Poppy
Making Memories Noteworthy Addie: Artisan Flower
Teresa Collins: Document and Tags Journaling Cards
Making Memories Delaney: Scalloped, Ledger Circle
Making Memories Passport: Fragile, Road Sign
Bo Bunny Summer Cottage: Flourish, Buds, Pottery, Summer Cottage
Daisy D’s Chloe Marie: Corfu, Daffodil and Santorini
Daisy D’s Wonder Years: I’m Home, Let’s Picnic, Catching Fireflies
Cosmo Cricket Hello Sunshine: Hula Hoop, Hopscotch, Picnic, Strip Tease
10 sheets coordinating cardstock

Transparencies and Clear Bits
1 sheet Narratives Melon Bloom Transparency
Assortment Making Memories Noteworthy Clear Glitter Box Collection
1 Clear Scraps Acrylic Frame (assorted shapes, approximately 4 inches)
4 sheets assorted rub-ons from the Narratives Bloom and Florals and Borders Swatch Books
1 Maya Road Sheer House Keychain
1 Maya Road Calendar Turn: A Day to Remember

Stickers
1 sheet Daisy D’s Wonder Years Tea Party Stickers
1 set October Afternoon Detours Rubber Charms
1 sheet Narratives Antique Cream Cardstock Circle Stickers
1 sheet Daisy D's Chloe Marie Expressions Cardstock Stickers

Chipboard
1 set Chatterbox Eclectique Chipboard Wings
1 Maya Road Chipboard Wings Keychain

Rub-ons
1 sheet Hambly Screenprints Vinatge White Rub-Ons
1 sheet Daisy D’s On the Lighter Side Rub-ons
1 set Scrapworks Magpie Chipboard

Alphabets
1 set October Afternoon Detours Alphabet Stickers
1 set Making Memories Tiny Type: Ledger Brown
1 set Making Memories Mini Shimmer Alphabet: School House Black
1 set Making Memories Passport Chipboard Alphabet
1 set Making Memories Felt Alphabet: Lime

Florals
Assortment Prima Belle Fleur: Red
Assortment Prima Painterly Petals: Morningsong
1 package Heidi Swapp Lemonade Gel Blossoms
Assortment Making Memories Passport Canvas Flowers

Stamps
1 Maya Road Singleton Acrylic Stamp Ste: Hello My Name Is

Journaling Bits
1 sheet Cosmo Cricket Hello Sunshine Journaling Cards
1 Making Memories Delaney Spiral Journaling Book
1 sheet October Afternoon Detours Journaling Cards

Brads
2 Marah Johnson Winged Hearts Brads (not shown)
Assortment of the brads from the following: Creative Lifestyle Red Plush Brads (not shown), Doodlebug Crushed Velvet Brads: Brights Assortment, Basic Grey Cupcake Brads Assortment

Other Embellishments
Assortment Maya Road Butterflies and Hearts Trinkets
Assortment Prima Center Kisses: Red
Assortment Making Memories Animal Crackers Jack Felt Shapes
2 small bottles Doodlebug Crushed Velvet Flock (assorted colors)
1 yard Prima Orange Lace
1 swatch Aqua Glitter Sheer Fabric
1 yard ric-rac (not shown)
1 long swatch Tulle (not shown)
1 Creative Lifestyle Felt Pocket: Red
1 package SEI Poppy Die-Cuts
1 package Kaiser Lime Rhinestone Gems


Content list is subject to change due to manufacturer shortages or oversights. You will be notified of any changes prior to the shipping of the kit.

You can order your here:
http://homegrownscrapbooks.com/Merchant2/merchant.mvc?Screen=CTGY&Store_Code=HS&Category_Code=111SuSK08I

Wednesday, June 04, 2008

Member Spotlight!

This week we get to know more about JUDE


My name is Judy, but my friends all call me Jude. I have lived in Southern California most of my life. The only other place I have lived is Key West, Florida. I seem to scrap mostly events, but I am trying to take more everyday photos.

I was introduced to scrapping about ten years ago at a CM party. I soon outgrew their products and went looking for more goodies. I discovered Homegrown a couple of years ago and have been getting the Trilogy ever since. This is my first Survival kit and I am loving it.

Basic Grey and Fancy Pants are 2 of my favorites manufacturers, but I like to work with all of the lines. There are so many great lines out there and I want to play with them all.


I have recently rediscovered buttons and I have to use chalk ink on all of my edges.

I usually start with the photos and decide what type of feeling I want the page to have. Then, I look through my stash for some paper that matches that feeling. I rarely have an idea on how the page is going to come out and find it very hard to work with sketches.

I think my scrapbooking style is clean and linear. I like the photos and embellishments to tell the story and find it difficult to journal.

I find a lot of inspiration in fabric. I often see a print on an article of clothing
or a bolt of material that inspires me to incorporate those colors or shapes into a page.


Thank you Jude!!

Lisa

Tuesday, June 03, 2008

Technique Tuesday!!

Stamping with Audrey Tan!!

I got into stamping during my card-making days. When I made the switch to scrapbooking, my love for stamping accelerated with the advent of acrylic stamps. Suddenly stamping became much easier and more fun now that you could see exactly where you are stamping. For this article, I will be focusing on acrylic stamps.

Here are some tips with regards to using acrylic stamps:

I’ve noticed that different acrylic stamps have different level of ‘sponginess’ i.e. the thickness of the stamp. Now this can pose a problem as to how much pressure is required to stamp without smudging the image. I would suggest testing it out on a scrap piece of paper the different pressure applied to stamping. Normally you do not need to press so hard when using acrylic stamps otherwise this will result in a smudged image.

If you do happened to get a smudged image (which I do sometimes), I find that outlining the stamped image with a black pen helps to better define the image.

Inks.
There are many different types of inks on the market but I’ve noted down the common few that I usually use for stamping:

Tsukineko Brillance and Versamagic dewdrops
These inks are also great for stamping on both porous i.e paper and non-porous surfaces i.e. metal, transparency, glass, wood etc. However, do allow for drying time.

Tim Holtz Distressed inkpads
Some acrylic stamps do not take well to these inkpads as the ink sometimes do not stay on well and as a result, you do not get a clear image. It is best to test it out before applying it onto your project.

Colorbox chalk cateye inks
They can be used for stamping and you get a muted colour effect. However, they do stain certain acrylic stamps badly. It doesn’t affect the stamp though.

StazOn inks
These are solvent inks and were designed more for rubber stamps. They can still be use for acrylic stamps although I would use them sparingly.

Here are some ways that I’ve incorporated stamping into my pages and projects:
I use them as accents on a page.

In this mini album, I’ve stamped randomly on it to mimic the splats made by snowballs.


As part of embellishing a page. In this layout, I stamped the swirls and
cut them out and arranged them on a page.


To create a pattern. In the same layout, I stamped and created a border at the top and the bottom of the page.


Last but not least, use a stamped image as a base for doodling. Stamped an image and make it interesting by adding doodling to it. In this card, I stamped the swirls using Prima Build a Swirl stamp set. I then doodled on it to give it a unique look.

Monday, June 02, 2008

Designer Lift

Happy Monday!!

This week we bring you the wonderful work of Kim Moreno and Leena Loh.
Kim created to incredible layout called A Typical Summer Day

Leena put her spin on it and created this wonderful layout called What A Perfect Day

Great job ladies!!

I hope this inspires you to create a lift!
Enjoy your day!
Lisa

Sunday, June 01, 2008

Introducing Fall Survial Design Team Member...


Marie Pilgrim


Hi! My name is Marie Pilgrim. I’m a thirty-something speech-language pathologist, who works in the public schools. I’m very happily married to my college sweetheart, who is going back to graduate school to become an SLP, too!


No kids yet (we're praying hard), but we have a spoiled chocolate lab who thinks he’s our kid (probably because we treat him like our kid). When I’m not at work, I’m usually at church; I’m involved in children’s and women’s ministries.


During my downtime, you’ll find me either reading (voraciously) or scrapbooking! I’ve been scrapbooking since 1990 but it’s definitely become an obsession in the last few years. My favorite supplies are patterned paper, rub-ons, and lately I’ve developed an addiction to buttons.


My style tends to have a graphic/linear foundation and then I have fun layering patterns and embellishments on top!


Please joine me in welcoming Marie to the Summer Survival Design Team!