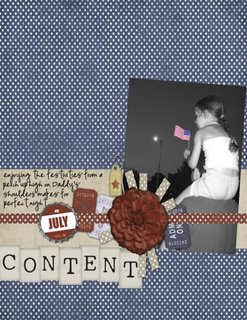
Selective color is a really cool, but super simple, effect that anyone can achieve with Photoshop Elements or Photoshop Creative Suite. (With that said, I'm sure there are other programs that can achieve the same effect, but I'm not sure how those work. So for purposes of our instruction here, I'll be using Photoshop.) I used selective color in the layout above to highlight the American flag my daughter was waving. (Glory Days kit and accents by Holly McCaig, available at Plain Digital Wrapper).
To create an effect like the one above, you'll need to open your photo in Photoshop. Make a duplicate layer of it, because you NEVER want to make changes to an original photo. Once you have a copy, go ahead and close the original layer.
With the copy layer active, click on that layer in your layers palette and choose duplicate layer. Under Image, choose remove color. This will change your top layer to a grayscale image. You can then adjust the contrast and brightness to your liking. Some people also use convert to grayscale or other set conversions for this step -- use whatever you feel comfortable doing.
Make sure the black and white copy is on top and active. Zoom in several times on the area you'll be working in, and then choose your eraser tool from your shortcuts. You can adjust the pixel size at the top until you get a size that's comfortable to work with. Now, simply erase any sections of the black and white photo that you want to remain in color. This is essentially "erasing" that portion of your layer, so the layer below is now showing through.
When you are finished, flatten your layers and save your image under a new file name.


1 comment:
I always wanted to know how to do that, but somehow whenever I change the copied layer to b/w the original layer becomes b/w, too...Can you tell me what I may have done wrong?
Post a Comment